

Montana Casting Co. News & Blog
-
![Reflections on a Weekend Fly Fishing Among Women (Part 1)]()

The Women’s Fly Fishing Clinic at Hidden Canyon Lodge
Stepping into Hidden Canyon Lodge on a cool April evening, the first sensation I felt was one of warmth. A fire glowed in the hearth and a cozy sitting area—decked out in a tasteful hodge-podge of fly fishing memorabilia and old-timey antiques—buzzed with conversation. Drinks were being mixed behind the bar. Savory smells drifted from the kitchen. I felt my anxiety melt away immediately.
I’d come for the fourth annual women’s fly fishing clinic hosted each year in partnership with Wolf Creek Angler—a fly shop nestled in nearby Wolf Creek, Montana. Kicking off on a Friday evening with cocktails and dinner, the weekend ahead promised plenty of fly fishing, good food, and—of course—the company of my fellow female anglers.
…
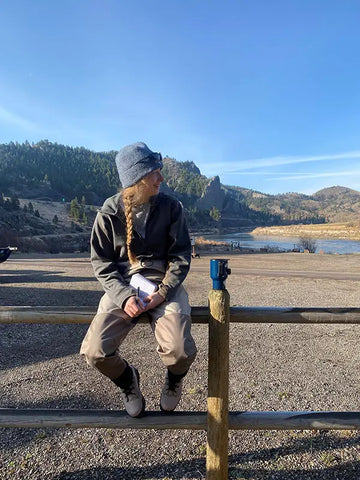
 Montana's Upper Missouri River has many moods, all of them beautiful.
I grew up in Helena, Montana, a stone’s throw from one of the world’s premier blue-ribbon trout fisheries: the Missouri River. These days, I work for Montana Casting Co., writing about fly fishing for a living. Those two facts always seem like they should be connected, but in truth I’ve never really considered myself an angler until recently.
It wasn’t for lack of trying on behalf of my parents. When I was little, my father put a fly rod in my hand at every opportunity—and he was endlessly patient. When I was older, I was lucky enough to meet a step-dad who never missed a chance to take the drift boat out and who spent his spare time building custom fly rods. In recent years, my mom has also become an avid angler. Now she rarely heads for the mountains without her fly rod handy.
In short, I was surrounded by people who loved fly fishing. I could see their passion for it and the excitement to share it with me. Because I didn’t want to disappoint them, I fished when they asked me to go fishing… But I never felt confident fishing alone, and that meant, despite years of off and on exposure, I was still very much a beginner every time I picked up a fly rod. And that was frustrating.
When the option to attend a women’s fly fishing clinic arose, I was nervous. I could feel old insecurities circulating in the back of my mind: what if I looked unpracticed? What if they noticed I was a “fake” fly fisherman? I already felt hesitant about the sport and I wasn’t sure I could match their passion or excitement for a weekend on the water. But there was also a feeling of anticipation. Perhaps this time around, I could discover what it might feel like to fly fish for myself.
Friday Night: Cocktails and Catch-Up
Hidden Canyon Lodge is roughly a ten-minute drive from the fly fishing mecca of Craig, Montana. Tucked into an offshoot of the Missouri River canyon, it’s a few short strides from the Mountain Palace Fishing Access Site along Old U.S. Highway 191.
Modern luxury hides a storied past: built in the early 1900s, it began as the Mountain Palace Tavern—a once bustling stop-over for travelers between Helena and Great Falls. “Anyone over fifty still knows it that way,” Madeleine Cantoni, manager and executive chef, told me with a laugh during a phone call following the clinic.
Since the 1970s, it’s seen a stint as a biker bar, a period as the Fly Fisher’s Inn, and several years of dormancy before it was finally bought in 2016 by current owners Peter and Patricia Wooldridge. Heavy renovation and restoration of the original cabin structure resulted in a luxurious, Montana getaway perfectly suited to the fly fishermen who flock to the Missouri year after year.
Long days in the outdoors don’t always lend themselves to the cleanliest of clientele—but you wouldn’t have known it given the sparkling state of Hidden Canyon Lodge’s beautiful rooms. I dropped my bags beside a luxurious queen bed. Between the clean and comfy furnishings, heated bathroom tiles, fully stocked Keurig, and a generous handful of Werther’s Original candies, I was half tempted to spend the rest of my evening relaxing in the confines of my room.
Alas, that queen bed would have to wait. I stepped out into the crisp evening air and headed for the main lodge. It was time to say hello to the ladies.
 Sundown at Hidden Canyon Lodge along Montana's Upper Missouri River.
The core group of women who attend this particular fly fishing clinic hasn’t changed too much since the first clinic in 2021. The end result feels more like a family reunion than a random gathering of individuals looking to improve their fly fishing skills. The introductory cocktail hour is filled with hugs and stories from the year past—but they’re not the only familiar faces. Three of the weekend’s four guides trickled in as the evening progressed: Libby Stultz, Kara Tripp, and Shalon Hastings—who’s been with the clinic from its very inception.
There’s still a relatively limited number of female guides on the river, so getting enough of them to lead this clinic annually is one of the challenges Jason Orzechowski (co-founder of Wolf Creek Angler and owner of Iron Fly Outfitting) and Shalon face each year when organizing the event. “We do have other female guides on the river,” Shalon told me later, “but they’re booked.” This year, they asked the cheerful and easy-going Luke Koerten to guide the fourth boat.
Though I didn’t end up sharing a boat with Shalon, I did get the chance to pick her brain the following week during a phone call. I was interested to hear if she’s faced any challenges breaking into a community that has long been male-dominated. She took a moment to answer—she’s got a warm, thoughtful presence about her that immediately puts me at ease—then said, “It’s been great, to be honest.”
Prior to becoming a guide, she already had roots in the fly fishing community. After owning and operating small businesses in downtown Helena for years—including the popular coffee shop Hub Coffee and Taco Del Sol—she saw a rising demand for fly fishing instruction among female anglers. In March of 2018, she helped kick off Last Chance Fly Gals, a nonprofit working to connect female anglers with community, education, and meaningful experiences. Shalon went on to start Fly FisHer Adventures (currently offering personalized instruction for women anglers in partnership with Iron Fly Outfitting) and become a certified guide, citing the support and teaching of other guides as an important factor in her success.
Jason attended the first meeting of Last Chance Fly Gals as a sponsor. Just six years prior, he'd moved his family to Montana to pursue fly fishing as a career and embrace the outdoors lifestyle. After a year of guiding and managing a fly shop for Montana River Outfitters, he purchased the fly shop from MRO, remodeled, and opened Wolf Creek Angler in the spring of 2014. Now, WCA is a go-to source for guide services, shuttles, watercraft rentals, gear (including an impressive selection of fly patterns), river info, and great advice for making the most out of your fly fishing adventures. The idea for a women's clinic came to Jason after seeing the massive turn out for the Last Chance Fly Gals meeting, and he approached Shalon about it soon after.
Since the first successful clinic in 2021, it’s morphed from a station-heavy course in fly fishing basics to a small community of gung-ho female anglers who reunite on an annual basis. Shalon has come to look forward to the experience each year. “I marvel at this, and it happens at other women’s clinics I do… The women just mesh.”
…
That “meshing” was on full display night one around the dinner table. The initial awkwardness of getting reacquainted soon devolved into fluid conversation jumping between work drama to new puppies to exciting fly fishing adventures—many of which came from Kara’s reflections on guiding in Chile and Argentina. (The size of the trout and the force of the winds at Patagonia’s Jurassic Lake both seem truly legendary.)
At some point, Kara posed a question to the group: “What’s been your biggest high and your biggest low from the past year?” There was a collective moment of silence before someone started laughing. “Getting right into the deep stuff, aren’t we?” But the women around that table didn’t shy away from the deep stuff. One by one, we all shared.
The highs were beautiful—new found job satisfaction, a grandbaby on the way, an adorable puppy joining the family, or simply getting to be there for a weekend of fishing on the Missouri. The lows were hard—family members battling cancer or other diseases, difficult transitions in relationships or jobs. For a moment, we all got to see one another for the complex human beings that we are, and it was humbling.
 Example Hidden Canyon Lodge dinner menu featuring night two's feast
The night ended with some delightful huckleberry cheesecake—the sinful punctuation to a multi-course dinner including fresh Caesar salad, spinach-stuffed chicken over pilaf rice, and hand-picked wine pairings. (I feel it’s worth mentioning that several participants throughout the weekend cited the food as a significant factor in returning to this clinic year after year. Madi takes pride in the lodge’s culinary offerings. She, along with the other chefs she manages, are encouraged to be creative…and it’s yet to disappoint.)
Filled up on good food and good company, we all headed to bed with the promise of a wide-open river and flashing trout to lull us to sleep.
...
We'll be dropping part two of this three-part series next week, so stay tuned! In the meantime, a shout out to the organizers, partners, and guides who made this clinic possible:
Thank you to the staff at Hidden Canyon Lodge, who constantly worked behind the scenes to provide us with delicious food, pristine rooms, and friendly customer service. Thank you to our guides for sharing your endless patience, knowledge, and passion for fly fishing. And thank you to Jason, for your behind-the-scenes dedication in organizing this event. All of these wonderful people have found ways to embrace their love of fly fishing while also sharing that passion with others—check out their businesses below!
- Jason Orzechowski – Owner of Iron Fly Outfitting, co-founder of Wolf Creek Angler Fly Shop
- Madeliene Cantoni – Executive Chef and Manager at Hidden Canyon Lodge
- Shalon Hastings – Owner of FlyFisHer Adventures and founder of Last Chance Fly Gals
- Kara Tripp – Co-founder of Damsel Fly Fishing
- Libby Stultz – Co-founder of Bent Fly Fishing
- Luke Koerten – Guide for Iron Fly Outfitting
Questions? Comments? Fly fishing stories? Share them in the comments section below!
Reflections on a Weekend Fly Fishing Among Women (Part 1)
read more -
![Let’s Get into the Weeds: Fly Lines Part 3]()

Our fly line series so far...
If you’ve kept up with the previous two posts on fly lines, then you’ve slogged through a lot of information on fly line weight, taper, and general physics. Congratulations! You’ve graduated. I hope we’ve managed to beat back some of the mystery surrounding modern fly line specifications. At the very least, you’ve got a few facts in your back pocket to school your buddies with on the river.
If you haven’t kept up, no worries. Regardless of your familiarity with the Common Cents System (see Part 1) or the parts of a taper (see Part 2), Part 3 is meant to be a quick, user-friendly guide to Montana Casting Co. fly lines. Which line is best for you? Read on and find out.
The lowdown on Montana Casting Co. fly lines:
Montana Casting Company is rooted in the traditions of custom rod building. When we decided to expand from those roots, we decided to design our rods, reels, and fly lines in tandem so that each component could maximize the performance of the other. With a selection of three different fly lines in our store, you’re free to customize your line to fit your rod and the environment you plan to fish in.
Just to be clear, our fly rods can be used with any brand of fly line. If you have a tried-and-true brand that you fall back on, use it. Our rods will cast it with ease and accuracy. That said, we’ve put a considerable amount of thought into designing three fly lines that we believe will maximize the performance of your fly rod and we encourage you to give them a try. Here’s a simple rundown of what to look for when choosing a Montana Casting Co. fly line.
What do the names of MCCo. fly lines tell you?
You can choose between the MC-30, MC-38, and MC-40 fly line. Your first hint at the difference between these lines is in the name. MC-30, for instance, indicates that the tapered head of the fly line is in the first 30 feet. Additionally, there will be a number following the name of the general model to specify line weight; MC-306 refers to a 6 wt MC-30 line. As stated earlier, you’ll generally want to match the line weight to the weight of your fly rod.
When should I use the MC-30 fly line?
The tapered head of this fly line is in the first 30 feet, making this an aggressive weight-forward line. If your current fly rod is fast action and you're having trouble loading the rod, try this line; you’ll really feel the difference. This is also a great line for times when you’ll be consistently making short casts of 30 feet or less. It’s a blast to cast!
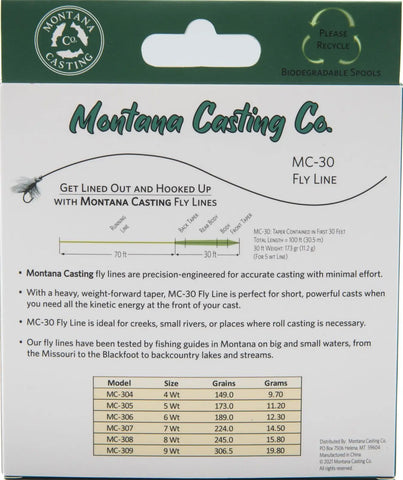 MC-30 Fly Line Specifications
When should I use the MC-38 fly line?
The tapered head of this fly line is in the first 38 feet. That extra 8 ft adds 30 grain to your standard fly line and serves as a happy medium between more aggressive weight forward lines and lengthier tapers meant for long casts. This is a great line for your day-in and day-out fishing trips, and it will work in any condition. (It pairs especially well with the smooth, medium action of the Craig Fly Rod!)
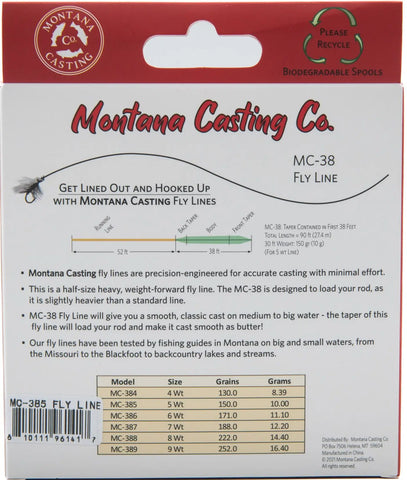 MC-38 Fly Line Specifications
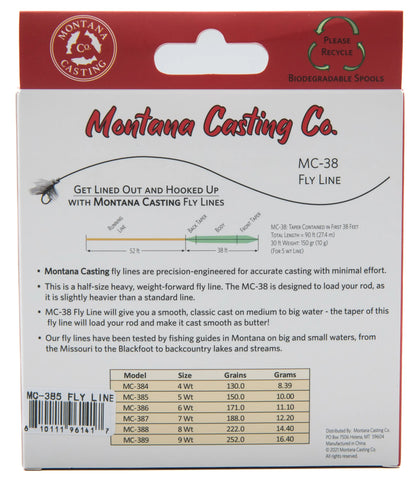
When should I use the MC-40 fly line?
The tapered head of this fly line is in the first 40 feet. This line fits the AFFTA standards, meaning that it is a standard taper line. Though it works well in all conditions, this line is perfect for long casts with dries to a skittish hog brown or the like. Gentle presentations are key, and the MC-40 is the right fly line for the job.
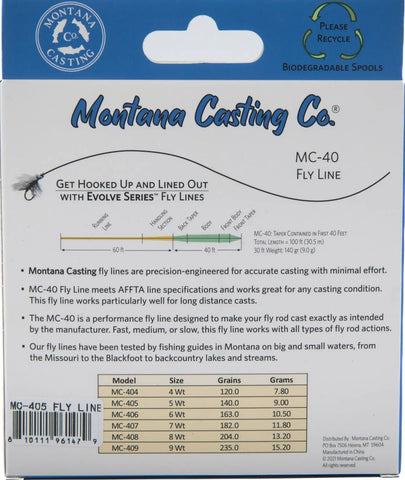 MC-40 Fly Line Specifications
Get out of the weeds and get fishing!
The question of which fly line is right for you can be a complicated one to answer. We’ve mercilessly dissected many fly lines over the years in the name of science… As a result, we’ve gotten our fly rods and fly lines to be exactly what we want them to be. That said, fly fishing is a sport of continuous learning and growth. So get out there, have fun, and experiment!
Have questions? Want to talk shop? We’re always happy to chat. Leave a comment below, send us an email at gethookedup@montanacastingco.com, or give us a call at 406-285-1452. Happy fishing!
Let’s Get into the Weeds: Fly Lines Part 3
read more -
![Let’s Get Into the Weeds: Fly Lines Part 2]()

Digging into Fly Line Taper
In Fly Lines Part 1, we looked at how a rod’s optimal line weight is determined using the Common Cents System as well as how additional factors (such as target species, weather conditions, and casting ability) might influence which line weight is right for you. This week’s post is all about taper. What is it? How does it vary across fly lines? Why do we care? Let’s jump back into the weeds!
What is taper?
In generic terms, taper refers to the shape of a fly line. Fly line shape (or diameter) usually varies throughout the length of the line. There are a few key components to a fly lines’ taper: the belly (where most of the mass is located), the front taper (the transition between the tip of the line and the belly), and the rear taper (the transition from the belly of the line to the running line). Varying the length and diameter of these different components allows for the creation of specialized fly lines.

Nowadays, there are several types of tapered fly lines, including weight-forward, double taper, shooting taper, and level line. Weight-forward fly lines are arguably the most popular, but we’ll also touch briefly on double taper lines.
What is a double taper fly line?
Double taper lines have a belly section that takes up most of the length of the fly line. The front and rear tapers are uniform in length and profile, and the middle of the taper is the exact center of the fly line. The idea behind this was to make your fly line last longer; once you wear out one side of the fly line, you can flip the line and use the back half just like a new fly line. Though they lack the direct power of weight forward lines, their longer, thinner tip section makes them ideal for delicate, dry fly presentations.
What is a weight forward fly line?
All Montana Casting Co. fly lines are designed with weight-forward tapers. As the name suggests, weight-forward lines are designed to carry most of the mass in the head of the line. A shorter, heavier belly pulls the comparatively light “running line” (or uniform, non-tapered section) forward. This makes it easier to shoot line over long distances, through windy conditions, or with a heavier, more air-resistant fly.
When you’re shopping around for a weight forward fly line, you’ll find differences in the lengths of the front and rear tapers as well as the belly sections. These factors influence the accuracy, presentation, line control, and the overall aggressiveness of the line. Choosing the right weight forward line is often a matter of determining what balance of these features is best for the conditions you’ll be fishing in.
For example, you might be fishing a fast-action fly rod on small rivers or creeks. You’re making short casts—30 feet or less. A shorter, more aggressive, weight-forward tapper will allow you to feel the rod load.
If you’re fishing a buttery-smooth, medium action and you’re float-tubing on a lake, you’ll want a longer tapered head to allow for longer casts and to help prevent your line from slapping the water behind you.
Or maybe you’re fishing with Montana Casting Co.’s “Old Blue” (the Warm Springs) and you’re looking to use it on everything from gurgling mountain creeks to big rivers and wide-open lakes. If you have a favorite rod, you’ll want to bring it everywhere—and that means you’ll want a medium taper line that can handle a variety of situations.
How can you tell what the tapper of the fly line you're looking at is?
Most modern fly lines have specifications online or on the packaging that inform you how long the tapper is and the weight in grains of the first 30 feet of the fly line (minus the level line). You might also see abbreviations (such as WF for weight forward lines) that tell you more about the lines. Here’s an example of what you will find on the packaging of a Montana Casting Co. fly line:
The final post in our three-part series on fly lines will cover Montana Casting Co. fly lines. We’ll talk design process, key differences, and how to decide which MCCo. line is right for your upcoming fly fishing adventures.
Disclaimer: Yes, we’ve mercilessly dissected and weighed many fly lines over the years to get our fly rods and fly lines to be exactly what we want them to be. I know it's terrible, but it was done in the name of science!
We’d love to answer any of your fly fishing related questions! Leave a comment below, send us an email at gethookedup@montanacastingco.com, or give us a call at 406-285-1452. Happy fishing!
Let’s Get Into the Weeds: Fly Lines Part 2
read more -
![Getting Hooked on Fly Fishing]()

The Little Brookie that Flew - A Fly Fishing Story by Hannah Dreesbach
I was in elementary school when my father first put a fly rod in my hand. We were in the Tizer Basin, walking a small, tumbling stream pock-marked by boulders. It was the sort of place that would leave any kid itching to explore. Fallen logs became bridges across deep holes. Crowded fir trees created pockets of shadow that hid lichen-covered stones and half-decayed stumps. I could have spent the entire day roaming the woods, inventing games beneath the shade of the trees. But my dad had brought me there to fish, and so I resigned myself to the tedious task of casting a bright little dry into the water over and over again.
I didn't think much about line placement or where the fish might actually be, even though I’m sure my dad offered wisdom on both of these subjects. For the most part, I tried to copy his movements (after all, he was actually catching fish). More often than not, I wound up with my line wrapped around an overhanging willow or snagged on a limb. The day, it seemed, was destined to be frustratingly fishless.
I suppose Mother Nature took pity on me: between snags, I managed to hook a single brookie—so small I didn't even feel it on the end of my line. When I went to recast, it sailed out of the water, past my head, and back in—unhooking itself in the process. I let out a shout. I’d caught a fish! I was a real fly fisherman, just like my dad.
It was a small moment in the scheme of things, but looking back, years later, I can’t help but smile. These days, I look forward to afternoons on the water, fly rod in hand, exploring the twists and turns of the river. I have my dad to thank for that. My dad and one tiny, miraculous brookie.
 Hannah Dreesbach enjoys a quiet moment before a day of fly fishing.
Questions? Comments? A story of your own first time on the water? Share in the comments below!
Getting Hooked on Fly Fishing
read more -
![Let's Get into the Weeds: Fly Lines Part 1]()

Which fly line is right for you?
The answer to that question can depend on a slew of factors, including the species of fish you plan to chase, the flies you plan to fish with, the conditions you’ll be fishing in, the action of your fly rod, and your own personal casting style.
I can already hear my son, Staiger, asking me to get to the point—“Let’s just go fishing already!” So let’s start with the short answer: you can buy just about any fly line for the designated weight of your rod and you’ll be ready to hit the water. If the short answer was all you wanted, then you can stop reading here. Have fun out there!
The long answer gets a bit more technical, and it involves a general understanding of a few different factors:
- The relationship between line weight and rod deflection
- How factors such as target species, fly casting ability, and fly rod action affect your ability to build energy behind a fly
- The ways in which different tapers can influence your cast
For those of you interested in understanding the differences between fly lines and why you might choose one over the other, this is the first in a three-part series that will dive into the nitty-gritty of all things fly line. In today’s post, we’ll touch on the first two bullet points in our list above.
What’s the connection between fly line weight and fly rod weight?
It’s easy to get deep into the weeds while discussing line weight, but we’ll start with some basics. The American Fly Fishing Trade Association (AFFTA) specifies a fly line’s weight based on the first 30 ft of a fly line minus the level line. (Level line refers to the section of line leading up to the beginning of the taper of the head of the fly line—more on that in the section on taper!)
The mass of the first 30 ft of line is measured in grains or grams. One grain is equal to 1/7000th of a Ib. One gram is equal to approximately 15.5 grains.

At its simplest, line weight refers to a number between 1 and 15 that corresponds with the range of line masses that will optimally load a rod of the same number.
To determine what fly line weight will allow for optimal loading of a rod under average conditions, we use a system called the Common Cents System (CCS).
What is the Common Cents System and how is it used?
The CCS makes the broad assumption that a rod is loaded when, fixed by its grip on a horizontal support, its tip has flexed vertically downward one third of the total length of the rod (not including the reel seat and cork). Therefore, if you know how many inches you need your rod tip to deflect vertically from the horizontal position, you can determine how much weight it will take to achieve a loaded state. The CCS does this with standard U.S. pennies and, through a series of conversions, allows you to determine the proper line weight for any given fly rod.
Let’s walk through an example. If you have a 9-foot fly rod that is 108 inches in total length, you’ll want to start by subtracting the length of the reel seat and cork—generally around 11 inches. This gives you a rod length of 97 inches. Now divide that by three and you’ll get 32.3 inches. 32 inches is the amount of deflection (flex) the rod needs to have from a level position in order to be loaded.
Next, you’ll hang a plastic bag with a paperclip to the end of the fly rod and see how many pennies it takes to give the rod that 32 inches of deflection. In this example, let’s say it takes 43 pennies. You’ll need the conversion table below to convert the number of pennies into its corresponding rod/fly line weight. If it takes 43 pennies to deflect the rod 32 inches, then the rod will (in theory) load most efficiently with a 5 weight fly line.

The CCS conversion table also allows you to convert the number of pennies into a number of other metrics that pertain to your fly rod’s performance, such as the Effective Rod Number (ERN)—a measure of your fly rod’s general power or backbone. Continuing with our example, 43 common cents (or pennies) correspond with an ERN of approximately 5.5—meaning it’s a mid-range 5weight fly rod. (All rods with ERN values ranging from 5.0 to 5.99 can be considered 5 weight rods; of course, the higher the ERN number, the closer you get to being a 6 weight fly rod. Conversely, the lower the ERN number, the closer your rod gets to being a 4 weight).
You’ll also see Defined Bending Index (DBI), which is a combination of the rod’s ERN and Action Angle (AA). Generally speaking, the higher the ERN, the greater the power. The higher the AA, the faster the action. Thus, DBI is a metric that allows for a swift comparison of the relative power and action of any fly rod.
Why do we care about line weight (or, more accurately, mass)?
While the Common Cents System gives us a good basis for determining what fly line weight works for a given rod under average conditions, you won’t necessarily be contending with average conditions on the water. The weight of your fly, the weather, the distance you need to cast, and your skill level can all influence which line will help you achieve optimal loading.
Let’s think about energy for a moment. A good cast is all about building potential energy and converting it into the right amount of kinetic energy to launch your fly across the water and land the perfect presentation. If you want to get into the physics of it, kinetic energy (or the energy of motion) is determined by the following equation:
Kinetic Energy = (½)mv^2
This means there are two important factors to consider in your cast: how much mass (m) you’ve got in your fly line and how much velocity (v) you can give that mass. The more you have of either one of these, the more kinetic energy you’ll have driving your fly forward.
We can apply this concept by first thinking about the mass of your chosen fly. Since the fly line is what ultimately propels your fly forward, a larger fly will need a heavier fly line to generate the energy needed to cast it effectively. The same thought process goes for windy conditions: if you’re fighting the wind, you will need to generate more energy to overcome the wind. Therefore, a heavier line will likely be ideal for windier conditions.
That said, if you’re a skilled caster or have a faster action rod and can generate a lot of line speed, you may not need as heavy of a line to generate the same amount of kinetic energy as someone who is less experienced or working with a softer action fly rod.
Practically speaking, this might look like choosing a line that is one weight class above or below the AFFTA recommended weight, depending on your needs. If you’re just getting into fly fishing, however, it’s probably best to stick with the line weight corresponding with your rod weight—after some time on the water, you’ll start to feel where you might need a heavier or light line weight.
In our next post about fly lines, we’ll dive into taper—what is it and how does it impact your cast?
Disclaimer: Yes, we have mercilessly dissected and weighed many fly lines over the years to get our fly rods and fly lines to be exactly what we want them to be. I know it's terrible, but it was done in the name of science!
Have questions? Want to talk shop? We’re always happy to chat. Leave a comment below, send us an email at gethookedup@montanacastingco.com, or give us a call at 406-285-1452. Happy fishing!
Let's Get into the Weeds: Fly Lines Part 1
read more -
![Rigging Your New Fly Rod & Reel]()

Rigging Your New Fly Fishing Rod & Reel
The big day is here; you finally have your new dream fly rod and reel in hand. The excitement is almost too much to handle! You're daydreaming about the river, campfires, sharing stories with friends, and, of course, fish—BIG FISH. If you’re going to make those big fish dreams a reality, there’re some important choices to consider when rigging up your new fly-fishing outfit.
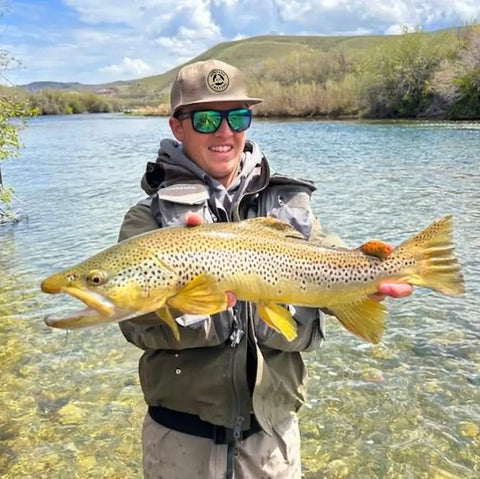 Spring fly fishing for brown trout.
Setting Up Your Fly Reel and Line
If you purchase a Montana Casting Co. Fly Rod Outfit through our Outfit Builder, we will ask the following questions to ensure that we spool your reel correctly:
What hand do I reel with - left or right?
This impacts which direction the backing and fly line needs to be spooled onto the reel. It is also important to ensure that the drag system works appropriately for whichever hand you reel with.
When attaching your leader, what do you prefer?
- Attaching the loop on your leader directly to the welded loop on your fly line, or…
- Adding a butt section (a 2-foot length of monofilament) and then tying your leader to the butt section with a blood knot?
Setting Up Your Leader and Tippet
With backing and fly line on your new reel and your Outfit in hand, it’s time to decide how you’ll rig your leader. There are hundreds of variables involved in rigging your leader: the species you’re fishing for, the water conditions, temperature, what insects are hatching, and fishing style (nymphing, fishing dries, or stripping streamers) to name a few. The list can go on indefinitely, which is a big part of the allure of fly fishing—there’s always more to learn. For the sake of this blog article, we’ll try to keep things simple. You can (and will likely want to) modify these suggestions depending on the conditions you're fishing in.
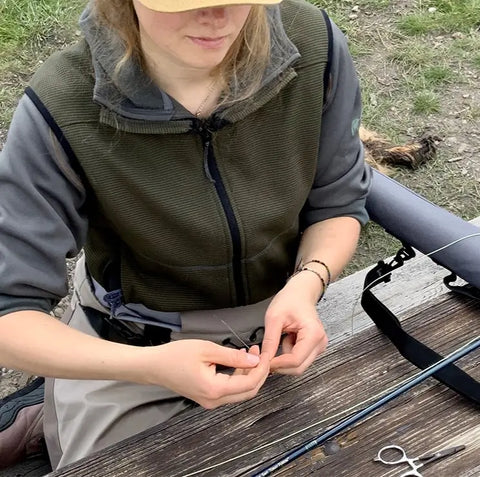 Rigging up for nymphing with the Warm Springs fly rod.
Fishing Dry Flies:
This is the easiest to rig but the most difficult to fish when trying to get the perfect presentation.
- We prefer a 9-foot monofilament (Mono) leader for fishing dries.
- Tie on 24 inches of the appropriate size Monofilament Tippet; Mono floats better than Fluorocarbon (Fluoro) and is less expensive.
- Pick your fly and tie it on with a Clinch Knot, put some floatant on the fly and start fishing.
Nymphing:
This rig is used to catch fish subsurface in rivers and lakes. In Montana, it’s common to use two flies—you’ll want to check the recommendations and regulations pertaining to the region you’re fishing in.
- Attach a 7.5-foot Mono leader to your fly line or butt section.
- Attach your strike indicator on the thicker end of the leader, closer to your line or butt section.
- Cut off approximately 18 inches of your new leader and tie on a tippet ring or micro swivel.
- Tie an 18-inch length of Fluoro tippet to the tippet ring or micro swivel. (Fluoro sinks and is virtually invisible underwater, making it perfect for nymphing.)
- Tie your first fly to the bottom of the Fluoro tippet.
- Tie a 24-inch length of Fluoro tippet to the bend of the hook of your first fly.
- Tie your second fly to the end of the new length of Fluoro tippet.
- Add some non-lead split shots to your leader to help it sink down to where the fish are. We like to put a B-size split shot above the tippet ring and another in between our flies. You may need to add or remove a split shot to get the depth correct. Our rule of thumb on freestone streams: the nymphs should bounce across the bottom or be very close to it.
Streamer Fishing:
This rig mimics a minnow or wounded bait fish. Often, this technique results in large fish crushing your fly. In other words, if you’re looking for big fish and only big fish, tie on a streamer.
- Shorten your leader to only 3 or 4 feet long.
- Tie on a heavy piece of Fluoro tippet, like 3X.
- Tie on your streamer and go fishing.
Conclusion
If you’re new to fly fishing, remember that part of the sport is expanding an ever-growing repertoire of skills. Even the best fly fishermen still have more to learn, so enjoy the process and don’t be afraid to trial and error your way to success. Those big fish daydreams are well within your reach.
 Happy fishing!
Still have questions? Drop them in the comments below or head over to our Contact Us page to reach out!
Rigging Your New Fly Rod & Reel
read more -
![Choosing the Right Fly Rod Weight]()

What is Fly Rod Weight?
At its simplest, fly rod weight is an indicator of a blank's stiffness: the higher the “weight”, the stiffer the blank. Typically, you will match a fly rod’s weight to the corresponding weight in fly line. A 4wt fly rod with a 4wt line, a 5wt rod with a 5wt line, and so on. (That said, there are some instances where you may want to overline your rod with a heavier fly line—such as pairing a 6wt line with a fast-action 5wt to fully load your rod on shorter casts.)
Fly rod weight is also a general indicator of the fly rod’s action and backbone. A lower weight will have a lighter action and less backbone, ideal for lighter flies and smaller fish. Conversely, a higher weight makes for a heavier action and the ability to handle larger flies and fish.

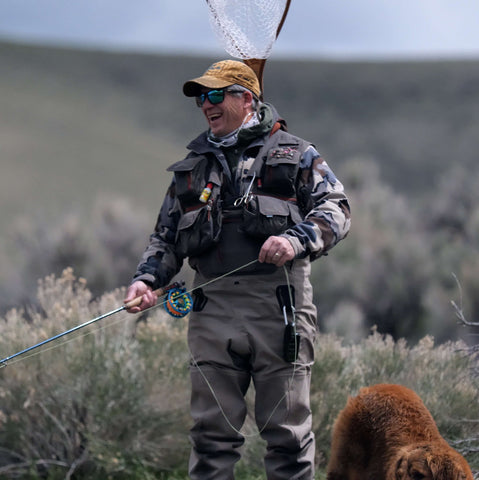
Fishing with a 9 ft 7wt Warm Springs Fly Rod
What size of a fly rod is right for you?
Fly rods are designed to fit specific fishing conditions. For example, we might take a 4wt Craig—a smooth, medium-action fly rod—on a weekend of creek fishing in the mountains. On an upcoming saltwater adventure, however, we’d be looking at a 9wt rod with a fast action to handle larger flies, windy conditions, and monster fish. When selecting a rod weight, think about the species you’re targeting and the conditions you’ll need to cast in.
4wt – These fly rods are very light in the hand, perfect for shorter casts and smaller fish like brook trout. That said, don’t doubt the power of a 4wt. These light fly rods are perfectly capable of taking on a 5lb brown trout with a bad attitude!
5wt – Still quite light in the hand, these mid-range rods work well on smaller water (similar to a 4wt) but carry a bit more backbone. It’s one of the most commonly used weights in trout fishing, likely for its ability to handle most trout from small juveniles to solid eight-pounders.
6wt – This rod is comparable to a 5wt, but it is specifically designed for larger water and fish in the 7 to 12lb class. Don’t be afraid to use a 6wt fly rod for smaller saltwater fly fishing excursions. They work well for long fly casting on open water and can also be a great streamer rod.
7wt – This is where you start to get into the big boys. 7wt fly rods generally come with a fighting butt to handle hard-fighting fish like steelhead. It’s a great choice for saltwater adventures or big, Pyramid Lake Cutthroats. This is the most commonly used size for streamer fishing. Add an extended fighting butt, and a 7wt becomes a lethal weapon!
8wt – 8wt fly rods are most commonly used for big fish on big water. We use this powerful fly rod for pike fishing, as pike are known to crush your streamer and go head-first into the weeds. You’ll be glad you have the extra power to pull them out of Neptune's quagmire while mumbling a few choice words!
9wt – Nothing says big dog like a 9wt fly rod! 9wt fly rods are frequent companions for fly fishermen heading to the Florida Keys, Costa Rica, or other tropical locations in pursuit of bonefish, permit, or tarpon. These rods have the backbone for fighting monsters and the action for long casts on open water. If you’re looking at purchasing a 9wt, big water adventures are in the cards!
Every Montana Casting Co. fly rod is available in a 4wt through 9wt. Our 7wt, 8wt, and 9wt rods come with a removable fighting butt that can be replaced with a longer custom build fighting butt from 4 to 5 inches in length. This allows you to cast your rod Spey style or give it a switch rod feel.
Questions, comments, upcoming fly fishing adventures? Share them in the comments below!
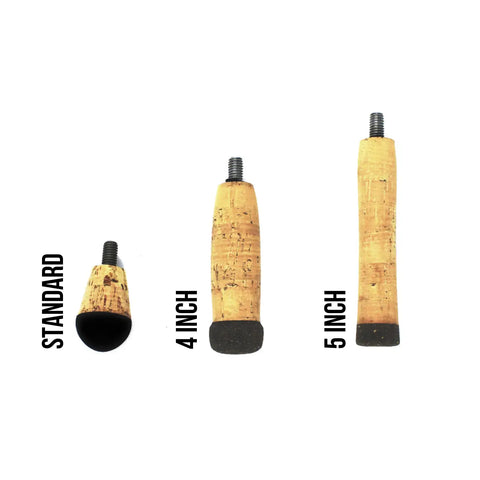
Example of standard and extended removable fighting butts.
Choosing the Right Fly Rod Weight
read more -
![Fly Fishing Knots: How to Tie a Blood Knot]()

Blood knots—complicated or simple?
Whether you’re grabbing your 4 wt fly rod for a weekend in the mountains or preparing for a trip to the salt flats, the blood knot is a worthy tool in any fly fisherman’s arsenal. To the inexperienced, they might appear complicated—but they don’t need to be. We’ve pulled together some tips and tricks to make tying this useful fly fishing knot simple.
When should you use a blood knot?
A blood knot, or—as the old timers used to call it—a barrel knot, is the best way to connect two pieces of tippet. This is especially true if your two pieces of tippet already have a fly tied to one end or if you're splicing in some tippet to lengthen your leader.
How to tie a blood knot:
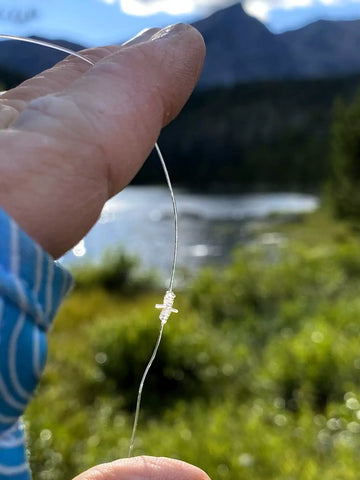
A blood knot is fairly straightforward to envision; all it consists of are two pieces of tippet being twisted around each other ten times, with the end of each piece of tippet running back through the middle of those twists.
The challenging part of a blood knot is getting the ends of the tippet back through the middle of the twists. So here’s a trick: start with an X. Beginning on one side of the X, take the free end of the tippet and twist it around the other tippet five times. Then, run the free end back through where the center of the ten twists will be (the side of the X that hasn’t been twisted yet). This will keep the middle of the twists open while you repeat the above steps on the other side of the X.

Since the first piece of tippet is already holding the middle of the twists open, you can run the second end of the tippet through the middle in the opposite direction of the first piece of tippet. Moisten the twists (this part is important to reduce friction when you are sinching down the knot), hold each end of the tippet, and pull; this will sinch everything down into a tight, barrel-shaped knot.
Clip off one of the ends and leave the other long enough to tie on a dropper fly. This method gives you more life-like action—which means more fish eating your flies.
At the end of the day, we find that a good visual (and lots of practice) are the best ways to familiarize yourself with a new knot. Check out the video below for a helpful step-by-step walk through from Montana Casting Co. CEO Scott Joyner… Then grab your fly fishing rod and hit the river to give it a try!
To view other educational videos and see our gear in action, visit our Montana Casting Co. YouTube Channel. And be sure to check out our Spring Sale!
Questions? Comments? Fly fishing stories? Share in the comment section below!Fly Fishing Knots: How to Tie a Blood Knot
read more


